Please join NCGE for our next live webinar on Tuesday September 14, 2010.
Webinar: GeoTagging Media
Date: September 14, 2010, 11AM Central
Description: This webinar is an introduction to geotagging digital photos and other media using ArcGIS Explorer Online, ArcGIS Explorer Desktop, and other free tools. GeoTagging is the process of assigning geographic information to digital media for mapping and visualization purposes. GeoTagging is great for class field trips, outdoor field experiences, storytelling, and travel.
Presenter: Dr Tom Baker, Esri Education Manager
Visit http://ncge.org for more information.
Showing posts with label Tools. Show all posts
Showing posts with label Tools. Show all posts
Wednesday, September 8, 2010
Thursday, March 18, 2010
Geocaching with an iPhone
Do you or your students carry iPhones or iTouches? Probably, since the word on the street is that 25% or more of the country's middle school kids carry one. If you are an avid geocacher, or still a muggle but interested in learning, read on to learn about this fun, outdoor activity!
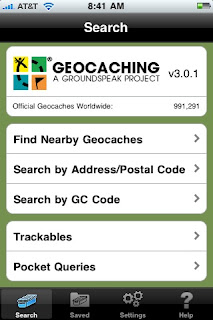 Geocaching is a high-tech scavenger hunt that uses coordinates to navigate to a hidden treasure, or geocache. Before iPhones, a geocacher needed to purchase a GPS receiver in order to geocache. Now, you can download one of many apps to your iPhone and go on your first hunt. There area couple geocaching apps out there, but I like the Geocaching App from Groundspeak. The app does cost a few dollars, but it's a lot less than buying an expensive GPS. Once you have downloaded the app and registered on geocaching.com for your free membership, you are ready to go!
You will then choose from the list which geocache you want to find, and a page with all the "specs" for that cache will come up. It will tell you how far the cache is, and give a description and hints to finding the cache. When you are ready to find your treasure, just hit "Navigate to Cache" and a map like the one below will come up.
 Geocaching is a high-tech scavenger hunt that uses coordinates to navigate to a hidden treasure, or geocache. Before iPhones, a geocacher needed to purchase a GPS receiver in order to geocache. Now, you can download one of many apps to your iPhone and go on your first hunt. There area couple geocaching apps out there, but I like the Geocaching App from Groundspeak. The app does cost a few dollars, but it's a lot less than buying an expensive GPS. Once you have downloaded the app and registered on geocaching.com for your free membership, you are ready to go!
The app itself is self-explanatory. In order to find nearby caches, you will have to allow it to use your current location. This is how I find most of my caches--I just go to a park and tell my app to "Find Nearby Geocaches" and up comes a list of all the caches, from the closest on out.
You will then choose from the list which geocache you want to find, and a page with all the "specs" for that cache will come up. It will tell you how far the cache is, and give a description and hints to finding the cache. When you are ready to find your treasure, just hit "Navigate to Cache" and a map like the one below will come up.
The balloon is the cache while the blue dot is you and the line of arrows is the path you will take to find the cache. If you hit the road button underneath the "View Compass" button, you can choose the type of map you prefer to use. 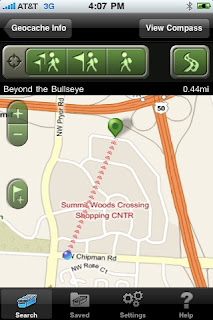
This app is nice because it connects directly to the geocaching.com website, meaning you will have access to thousands of caches all over the world. You can add specific caches to your favorites list, make field notes while caching, and look up a hint if you are having trouble finding a cache. There's even a compass setting to help you get your bearings if you are caching in an unfamiliar place. All in all, a very useful tool for a very fun activity. Happy Geocaching!!
Wednesday, March 17, 2010
GeoTagging with your own iPhone:Using PixelPipe
 Editorial Note: Pixel Pipe no longer transmits the location of the image at the time it was taken but rather the location at the time the image was transmitted. Pixel Pipe can still be a useful tool for students, if that can transmit the images immediately after taking them. (06/23/2010)
If you are a lone geotagger with an iPhone, you have many options (iPhone apps) for publishing your pics to the web.
I've experimented with a few photo-sharing applications, but I seem to keep coming back to PixelPipe, a service and an application for publishing pictures to a number of photo-sharing websites. PixelPipe's website boasts, "Publish photos, video, audio, text and files on over 100 online destinations and counting...". It is impressive! PixelPipe can run on Apple iPhones, Google Androids, Palm Pres, and several others. They've also created photo-sharing apps (or plug-ins) for: Firefox, Picasa, Google Talk and more.
.jpg)
This is a great way for the solo geotagger to make quick work of publishing images to a photo-sharing website that supports geotagged images, like Flickr or Picasa Web Albums. You can even tie PixelPipe to your Twitter account to automatically tweet about your newly uploaded pics.
The screenshots above are from PixelPipe running on an iPhone 3GS (publishing to Picasa Web Albums). Enjoy!
Friday, March 5, 2010
Microsoft Pro Photo Tools: A brief introduction

Pro Photo Tools allows you to geotag pics in three basic ways:
- Drag the picture and drop it on a map
- Geocode (calculate a lat/long based on street address) the picture, based on street address
- Import a GPS Track log and determine each photo's location based on where the GPS was at the time the picture was taken. This process requires you to synchronize your camera and GPS clocks.
 Unfortunately, Pro Photo Tools will not allow you to type in a lat-long and assign it to a photo. You must use one of the three options above. However, the geocoding (address to lat/long) and reverse geocoding (lat/long to address) are excellent features to support geotagging - as are the Bing maps.
We'll explore specific features of Microsoft Pro Photo Tools 2 in future blogs. For now, you're on your own to explore or check out some of the featured articles.
Subscribe to:
Posts (Atom)